Now, let's explore the process of marking invoices as paid. When a customer submits their payment online, our system automatically registers the invoice as paid, streamlining the process seamlessly.
However, recognizing that many companies continue to accept checks and cash payments, we offer a user-friendly manual entry system for these transactions when they are received by mail. Here's how this manual entry process works:
Method #1
Click on the “Cash Register” menu button.

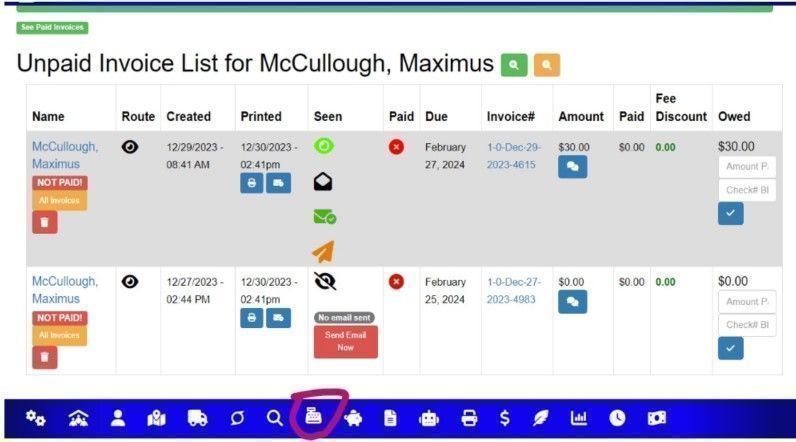
Type in the persons name or street address. Then click the persons name. You will see all the unpaid invoices for that customer. Here is what that will look like.

This screen is loaded with information regarding the customers invoices. If you click on the “See Paid Invoices” you will see a similar screen only with paid invoices. However lets see what the unpaid invoices contain and what you can do.
The first column gives you the name of the person. If you click on their name it will take you directly to their profile page. The orange button will take you to another page that shows all of their invoices paid and unpaid.
The twelfth and final column shows the total owed. Additionally you can enter any new amounts applied to the invoice and check numbers. After entering the amount of the check and check number or comment, click the blue check box and it will record that payment.
The eleventh column reveals any fees or discounts that are applied to the invoice.
The tenth column is the paid column which will show if anything was paid on the invoice.
The ninth column is the amount of the original invoice. You will notice a comment box in there as well. If you click on it then it will reveal any comments associated with the invoice and the comments associated with the users profile.
The eight column is the invoice number and if you click on the invoice number it will take you to a page that has more detailed information about the invoice.
The seventh column lets you know when the payment is due. If it is after the due date the system will automatically charge late fees according to what you set in the options panel.
The sixth column will have a red circle X in it if it is not paid, and if it is paid it will contain the date and time the invoice was fully paid.
The fifth column gives you more information about the users interaction with the invoice. If they saw it you will see a green eyeball and if you hover over it then you will see the date and time they first saw the invoice. If the eyeball is black that means they have not seen the invoice online yet. Furthermore this column will let you know if an email was sent and if it was you will see a green envelope with a check mark. If you want to send an additional email then click the orange plane icon. Furthermore, if you sent this email with expecting a confirmation then you will see a black open envelope and if you hover over the envelope it will tell you the date and time the customer opened the email containing the invoice.
The fourth column will show you the date it was printed and if you want to print it again just click on the print icon. If you want to print an envelope to mail to the customer you can click on the blue envelope. This will give you a screen to print out an envelope with the company return address on it.
The third column shows you the date and time the invoice was created.
The second column contains an eye. If you hover over it it will let you know what route the customer is on.
The third column shows you the date and time the invoice was created.
The fourth column will show you the date it was printed and if you want to print it again just click on the print icon. If you want to print an envelope to mail to the customer you can click on the blue envelope. This will give you a screen to print out an envelope with the company return address on it.
The fifth column gives you more information about the users interaction with the invoice. If they saw it you will see a green eyeball and if you hover over it then you will see the date and time they first saw the invoice. If the eyeball is black that means they have not seen the invoice online yet. Furthermore this column will let you know if an email was sent and if it was you will see a green envelope with a check mark. If you want to send an additional email then click the orange plane icon. Furthermore, if you sent this email with expecting a confirmation then you will see a black open envelope and if you hover over the envelope it will tell you the date and time the customer opened the email containing the invoice.
The sixth column will have a red circle X in it if it is not paid, and if it is paid it will contain the date and time the invoice was fully paid.
The seventh column lets you know when the payment is due. If it is after the due date the system will automatically charge late fees according to what you set in the options panel.
The eight column is the invoice number and if you click on the invoice number it will take you to a page that has more detailed information about the invoice.
The ninth column is the amount of the original invoice. You will notice a comment box in there as well. If you click on it then it will reveal any comments associated with the invoice and the comments associated with the users profile.
The tenth column is the paid column which will show if anything was paid on the invoice.
The eleventh column reveals any fees or discounts that are applied to the invoice.
The twelfth and final column shows the total owed. Additionally you can enter any new amounts applied to the invoice and check numbers. After entering the amount of the check and check number or comment, click the blue check box and it will record that payment.
Keep in mind this robust system automatically calculates everything for you. Here are a couple examples.
If the payment is exactly what is owed then the system will make the invoice paid and record the amount.
If the payment is too much, they system will enter the full amount for the invoice and give the customer credits for their next invoice.
If the payment is only a partial payment enter whatever it is and the check number. The system will apply the paid amount to the invoice but not mark the invoice paid.
Method #2
Type in the persons name or address in the search bar. Click on their name to go to their profile. If they owe invoices there is going to be a big red button on their profile. Click on the register button to go to their invoice. Then enter all the information that you need to enter the update the invoice.
Additionally on this page you can print an envelope and all the unpaid or partial paid invoices for that customer.
